another one
14 December 2008
10 December 2008
29 November 2008
skeleton photos
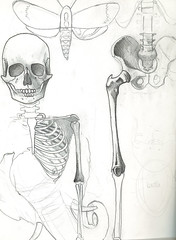
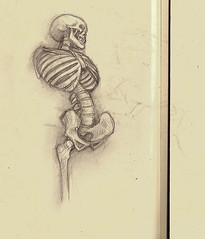
 here are the photos i shot of the large skeleton drawings. i have not edited them yet. feel free to download the ones that are yours for your blog and/or portfolio.
20 October 2008
full skeleton assignment

due november 10 (monday):
- one front 3/4 view of the full skeleton with value on the side plane
- one back 3/4 view of the full skeleton with value on the side plane
- use stonehenge 38" x 50" paper and tape or draw off a 2" border on all sides
- you may use the big drawing boards in 303
- you may use charcoal, conté, or graphite
objectives for the assignment:
 to represent the skeleton accurately in terms of anatomy and structure. this includes such things as treating the rib cage as a simple solid first, then drawing the individual ribs, and making sure that we can understand in the drawing how the ribs articulate with the spinal column. it means making sure all joints are believable, diagrammatic. make sure the bones are drawn as characteristically as possible: does the femur look like the longest bone in the body? does the humerus have a twist? is the fibula lower than the tibia? does the scapula occupy ribs 2 - 7? etc. all parts of the drawing should be as three-dimensional as possible, through adding and/or exaggerating edge planes.

- to create a structurally clear and anatomically accurate drawing that also emphasizes line variation. use line to 1) to create a sense of three-dimensionality within each form itself, and 2) create atmospheric perspective in the drawing (most contrast and detail in foreground, less contrast and detail in background). you will utilize edges/outlines for sure, but all outlines should be varied--if one edge of a bone is dark, the other should be light. edges on the light planes are best if they have some openness (let the open/gapped lines imply the edge).
 to use linear value. you will add a darker value to one plane in the drawing. you will choose a light source (typically above and to one side, like the sun at 10 am or 2 pm, for example). the plane away from the light source will be your darker plane, or your "side" plane. this works best when this plane is also the smaller of the two planes (larger front plane, narrower side plane, for example). this is so the drawing does not get overwhelmed with too much value. feel free to keep the value subtle. a little value can go a long way to adding to the illusion you've set up through line. too dark or textured of a value can have the opposite effect--so go easy.

- to incorporate your own drawing "handwriting." work on refining your own way of putting down marks, erasing, and laying down value. rely on your strengths and your natural tendencies to your advantage. try to find what makes sense to you as a draftsperson as you work with value and marks. each of you have your own way of creating a drawing. take the best of what you work with naturally and incorporate the ideas of line variation and linear value within your own style or handwriting.
- to use the principals of design to create a successful figure/ground relationship on the picture plane. we talked about the extra width of the page in relation to the height of the skeleton, and to make use of that extra space by incorporating close-up drawings of joints, vertebrae, the skull, etc. you could even add notes in this space as long as they add to the overall aesthetic of the drawing rather than distract from it. when you are trying to figure out what makes a good use of the page, think of the principals of design you learned as freshmen: balance, repetition, contrast, harmony, dominance, unity.
 to be conscious of your drawing process through the entire process of this assignment. for each drawing session you work on the skeleton, photograph your drawing (at least one with the skeleton in view) and write about the drawing process--what you accomplished, what you figured out, what problems you came across, what you plan to work on first next time, what you will need to do before you come back to the drawing, etc. create a blog post with this information for each of your drawing sessions as you work on this assignment.

- to help your blog group members through this assignment. each day from now until the assignment due date check your group members' blogs to see if they have posted about their skeleton assignment. if so, look at their images, read their summaries of their drawing processes, and comment thoughtfully and meaningfully to help them create the best skeleton drawings they can at this point in their education/artistic career. do this through noticing and asking questions first, then through advice-giving if the artist asks for it.
08 October 2008


digital artform
 digital artform: here is a website with some anatomy information, including some on the elbow joint as we were working on in class today.
the practice & science of drawing
 the practice & science of drawing
one of my favorite drawing books, now a free e-book at www.gutenberg.org
 notes from
 Drawing Lessons from the Great Masters: 100 Great Drawings Analyzed/Figure Drawing Fundamentals Defined
Robert Beverly Hale
Watson-Guptill Publications
New York, NY
1964
these excerpts address what we talked about in class yesterday, adding value to your drawing according to the form you've established on the page--rather than simply copying the light and shade that happen to appear on the form at that moment, in a particular situation. note especially the clarity of the value on the side plane on the albinus engraving (bottom) of the skeleton.
forms: their shape, lighting, and position
But first of all, in order to draw a specific form, you must be aware that this form exists. This is one of the reasons that figure drawing is so difficult for the beginner: in the human body, there are many forms which the beginner has neither heard of nor thought about. For him, these forms literally do not exist. For instance, many beginners are not conscious of the rib cage, the largest form in the body; very few are aware of the tensor of the fascia lata, though it is impossible to represent the pelvic region faithfully without a knowledge of this form. Indeed, this muscle takes six or more inches of the outline of the figure in certain poses; so you can imagine how important it is.
Once you are aware of the existence of a form, you must then come to an exact conclusion as to its shape. Unless you have decided on the exact shape of a form, how in the world can you communicate its exact shape to others?
Furthermore, you must light the form in such a way that it is recognized for what you have in mind and not for something else. A woman’s breast may be lit in such a way that it looks like a flat, white poker chip, or almost anything but its true, somewhat spherical form.
Finally, you must come to a decision about the position of the form in space. Certainly you will not wish to draw it in two or more places at once. Nor will you wish to draw a form in a position that does not reveal its true shape.
 practicing lines
Naturally, it is difficult for the beginner to carry all these matters in his mind at once. What is more, his unaccustomed hand will be unable to dra with precision the shapes he wishes to present. And his hand will be too heavy to render the necessary values (light and shade).
image: hale teaching at the art students league of new york
You must realize that there is no royal road to drawing. It is practice, practice all the way. (14)
basic geometric forms
You should practice drawing cubes, cylinders, and spheres. These are the simple, basic forms; the artist feels that all other forms are composed of these forms, or parts of them.
Soon you will discover that there are many forms that lie between the cube and the cylinder, between the cylinder and the sphere. An egg, for instance, is neither a cylinder nor a sphere; its shape lies somewhere between the two. In you mind, whittle away the vertical edges of the cube until it becomes a cylinder. Close up the top and bottom of the cylinder and imagine it as a sphere. In this way, you will begin to feel the relationship between these forms which becomes so important in the study of values.
Soon you will find you can give the symbol—the illusion—of any simple form you wish. After quite a while, you will realize that you can give the illusion of any complex form by combining the simple forms—or parts of the simple forms—of which the complex form is composed. (15)
learning to think in many-shaped boxes
When you are learning to draw, it is most important to cultivate the habit of forcing everything you see into its simplest geometric form. Do this sort of thing continually. It enables you to feel a form in its entirety, disregarding details which are so loved by the beginner. Above all, it promotes the ability to think in mass, which must become an instinctive habit, the most important habit the student can acquire. (16)
 Luca Cambiaso (1527-1585)
Group of Figures
pen and bistre
13 3/8” x 9 7/16”
Uffizi, Florence
In this drawing, Cambiaso shows you how an artist thinks of the figure in terms of simple masses. He used blocks to clarify the front and side planes and the up and down planes. He then threw a light from the left and from above. Thus, it was very easy for him to put shade on the side and down planes. If he had drawn perfectly life-like figures and put the same light and shade on them, they would ha looked very well.
Even in these block-like figures, Cambiaso still shows his anatomical training. The line (A) designates the top of the sacrum.
There is another principle nicely illustrated here. As the artist turs his attention from one block-like form to another, he varies the direction of each form. In other words, adjacent forms vary in direction, each to each.
(22-23)
Honoré Daumier (1808-1879)
Don Quixote and Sancho Panza
charcoal wahed with inia ink
7 3/8” x 12 1/8”
Metropolitan Museum of Art, New York
 Try re-drawing this Daumier, giving it the simple, block-like shapes of Cambiaso. Throw the light from the right and you will understand why Daumier put his shade where it is.
Incidentally, this drawing shows that Daumier was altogether intimate with the bones of horses. (Have you got a friend in the country who will send you some horse bones so that you can learn to draw horses?) Compare the horse with his rider and start to think of the basic similarities between men and animals. Don Quixote’s knee is at A hi horse’s knee is at B. Don Quixote’s ankle is at C; his horse’s ankle is at D. From here down, the horse’s leg is all foot. Notice the S curve on the back of the horse’s neck (E. This is the basic movement of the cervical or neck vertebrae of animals, but not of man.
inventing your own source of light
Where there is no light, there is no visible form. When light plays upon the form, tones appear and the form emerges. But naturally there are certain conditions of light under which an object will give the clearest presentation of its shape. Skilled artists can create these light conditions even though they do not exist. An accomplished artist is able to create his own light source or sources, disregarding, if he wishes, whose which do exist. Actually, an artist cannot only create new sources of light, but he can decide on their position, color, size, and intensity. He can therefore create his own highlights, darks, and halftones.
You can grasp the importance of inventing light sources if you think of certain problems confronting the landscape painter. In the morning, he starts to paint a tree; if the sun is on his right, the shade and cast shadows of the tree will be on his left. After lunch, however, when he is completing his picture, he will find the shade and cat shadow on the other side of the tree. You can see that this would be troublesome unless an artist had the power of Joshua, which indeed he has, for he can command the sun to stand still! The artist realizes that just as he cannot draw a moving object, but must seize upon a phase of the motion, so he cannot draw an object under a moving light source, unless he imagines the source as fixed.
 how light can destroy form
But there is a much more important reason why an artist must have the power to create his own sources of light: the light that plays upon a form frequently—almost in variably—does not reveal the true shape of the form. I assure you that it is possible to arrange your sources of light so that a cylinder looks like the window of a prison cell and a sphere like a soiled white poker ship. You can see what complications might arise if the cylinder happened to be your model’s neck, and the sphere her breast. This may sound exaggerated, but almost all beginners manage to make the egg-like form of the model’s thigh look like a roller coaster or a large piece of cheese which the mice have taken over. (62)
image:
bernard siegfried albinus
tabulae sceleti et musculorum
corporis hmani, 1747
plate 1
metropolitan museum of art, new york
23 September 2008
syllabus
art-4o1-oo1 & art-4o1-oo2
life drawing 2
fall 2008
monday/wednesday
2:30 – 5:35 pm
applied arts 303
save all drawings done during the semester
pre•requisites
you must have completed life drawing 1 (art 3o1) before participating in life drawing 2.
course•objectives
in life drawing 2, you will:
coursework
i expect you to
it’s important that you are in class—for access to the model, to hear comments i make, and to experience drawing in a studio setting. the class happens because all of you are here working together.
let me know via e-mail if you can’t make it to class.
rely on your classmates to show you drawings and notes you may have missed.
final exam
we will meet during the final exam time:
grading policy
• your grade will be based primarily on your final e-portfolio in which you showcase your learning over the semester and best examples from the class. this e-portfolio will include gesture drawings, long-pose drawings, maniken work, and blog summaries.
• a mid-term e-portfolio will be graded to give you an idea of your standing in the class at that point, but may be overridden by the quality of your final portfolio. In other words, the two grades will not be “averaged” for your final grade.
• your grade will also be affected by such “subjective” qualities as these:
it is part of my job—my responsibility—to give you a grade that lets you and other art “authorities” (other professors, employers, grad schools, gallery owners, etc.) know how your final portfolio and overall attitude during class measure up to given standards.
one useful way to think about grades is to consider them guides as to how other art professionals (besides me) would view your portfolio. how would a design firm see your work? a graduate school acceptance committee? other professors in the art & design department? gallery owners?
if i imagine i am an employer of designers, an A would mean you could start right away, a B would mean you might get hired if you get some more experience and refine your portfolio, a C would mean you are not ready for the job.
likewise, if you are considering graduate school, an A would mean your work is of the quality that would get you accepted into a grad program, a B would indicate that you might get accepted if you worked on your portfolio some more, a C would mean you are not ready to apply for graduate studies (in drawing/life drawing, anyway).
materials
newsprint (18" x 24" or 24” x 36”)
large drawing paper (Strathmore 100 lb. rolls, 42” x 10 yds.)
other drawing paper and supports, depending on your needs
drawing board and clips
masking tape
ruler
charcoal
charcoal pencil
conte
conte pencil
erasers
ink with pen or brush
pastels
x-acto knife
sand paper
texts
atlas of human musculature in clay (volumes 1 – 5), jon zahourek, ed. kenneth morgareidge, zahourek systems, inc., 1994.
in addition to the texts, each student will be checked out a half maniken for his/her use during the semester. The manikens are property of uw-stout instructional resources services. you are responsible for the maniken checked out to you. if the maniken is missing, lost, damaged, etc., you are financially responsible to replace it through irs.
videos
world famous lectures on artistic anatomy & figure drawing
robert beverly hale
lecture 1 rib cage [78 minutes]
lecture 2 pelvis [ 81 minutes]
lecture 3 leg [74 minutes]
lecture 4 foot [ 72 minutes]
lecture 5 shoulder girdle I [77 minutes]
lecture 6 shoulder girdle ll [ 68 minutes]
lecture 7 arm [76 minutes]
lecture 8 hand [80 minutes]
lecture 9 head/skull [80 minutes]
lecture 10 head and features [97 minutes]
these are available in the library.
art education artifacts
the course objectives of this course meet:
• wisconsin standard 1: the teacher understands the central concepts, tools of inquiry, and structures of the discipline(s) he or she teaches.
• uw stout school of education domain 1a: demonstrating knowledge of content and pedagogy.
• wisconsin standard 9: the teacher is a reflective practitioner.
portfolio artifact: final project
• art education students will be required to reflect in writing on this artifact.
• art education students will be required to upload papers and digital images of their studio works into their e-portfolios.
life drawing 2
fall 2008
monday/wednesday
2:30 – 5:35 pm
applied arts 303
save all drawings done during the semester
pre•requisites
you must have completed life drawing 1 (art 3o1) before participating in life drawing 2.
course•objectives
in life drawing 2, you will:
- deepen your understanding of artistic anatomy.
- refine your use of line, mark-making, and value to describe the figure in illusionistic space.
- wrestle with complex drawing issues such as exaggeration and distortion of forms, description of the environment around the figure, development of multiple-figure compositions, etc.
- expand the use of media, scale, and point of view in your drawings.
- examine ways of representing the body.
- develop and research ideas, concerns, and obsessions you want to attend to in your drawings.
- look at historical and contemporary examples of other artists’ representations of the figure.
- find source material and imagery for creating your own drawings.
- use writing to explore influences, clarify ideas, and analyze drawings.
coursework
i expect you to
- attend class
- give considerable focus and energy to the drawing process, ask questions, engage in class discussions, communicate with me any concerns about the class or course work
- complete assigned course work:
in-class drawingsattendance
homework assignments
blog posts
final project
it’s important that you are in class—for access to the model, to hear comments i make, and to experience drawing in a studio setting. the class happens because all of you are here working together.
let me know via e-mail if you can’t make it to class.
rely on your classmates to show you drawings and notes you may have missed.
final exam
we will meet during the final exam time:
friday, december 19 from 2:00 - 3:50 p.m.
grading policy
• your grade will be based primarily on your final e-portfolio in which you showcase your learning over the semester and best examples from the class. this e-portfolio will include gesture drawings, long-pose drawings, maniken work, and blog summaries.
• a mid-term e-portfolio will be graded to give you an idea of your standing in the class at that point, but may be overridden by the quality of your final portfolio. In other words, the two grades will not be “averaged” for your final grade.
• your grade will also be affected by such “subjective” qualities as these:
1. are you present?
2. in mind as well as body?
3. open to suggestions?
4. helpful in class discussions?
5. awake during lecture time?
it is part of my job—my responsibility—to give you a grade that lets you and other art “authorities” (other professors, employers, grad schools, gallery owners, etc.) know how your final portfolio and overall attitude during class measure up to given standards.
one useful way to think about grades is to consider them guides as to how other art professionals (besides me) would view your portfolio. how would a design firm see your work? a graduate school acceptance committee? other professors in the art & design department? gallery owners?
if i imagine i am an employer of designers, an A would mean you could start right away, a B would mean you might get hired if you get some more experience and refine your portfolio, a C would mean you are not ready for the job.
likewise, if you are considering graduate school, an A would mean your work is of the quality that would get you accepted into a grad program, a B would indicate that you might get accepted if you worked on your portfolio some more, a C would mean you are not ready to apply for graduate studies (in drawing/life drawing, anyway).
materials
newsprint (18" x 24" or 24” x 36”)
large drawing paper (Strathmore 100 lb. rolls, 42” x 10 yds.)
other drawing paper and supports, depending on your needs
drawing board and clips
masking tape
ruler
charcoal
charcoal pencil
conte
conte pencil
erasers
ink with pen or brush
pastels
x-acto knife
sand paper
texts
atlas of human musculature in clay (volumes 1 – 5), jon zahourek, ed. kenneth morgareidge, zahourek systems, inc., 1994.
in addition to the texts, each student will be checked out a half maniken for his/her use during the semester. The manikens are property of uw-stout instructional resources services. you are responsible for the maniken checked out to you. if the maniken is missing, lost, damaged, etc., you are financially responsible to replace it through irs.
videos
world famous lectures on artistic anatomy & figure drawing
robert beverly hale
lecture 1 rib cage [78 minutes]
lecture 2 pelvis [ 81 minutes]
lecture 3 leg [74 minutes]
lecture 4 foot [ 72 minutes]
lecture 5 shoulder girdle I [77 minutes]
lecture 6 shoulder girdle ll [ 68 minutes]
lecture 7 arm [76 minutes]
lecture 8 hand [80 minutes]
lecture 9 head/skull [80 minutes]
lecture 10 head and features [97 minutes]
these are available in the library.
art education artifacts
the course objectives of this course meet:
• wisconsin standard 1: the teacher understands the central concepts, tools of inquiry, and structures of the discipline(s) he or she teaches.
• uw stout school of education domain 1a: demonstrating knowledge of content and pedagogy.
• wisconsin standard 9: the teacher is a reflective practitioner.
portfolio artifact: final project
• art education students will be required to reflect in writing on this artifact.
• art education students will be required to upload papers and digital images of their studio works into their e-portfolios.
22 September 2008
gray's anatomy

here is one of the many links to images and text from gray's anatomy:
http://www.prohealthsys.com/anatomy/index.php
noticing
assignment for monday, september 29
- finish a vertebra/rib connection drawing if you haven't done so
- post the written noticing comments you wrote for karen, nou chee, sai, xai, and kalvin on their respective blogs.
- karen, nou chee, sai, xai, and kalvin: post images of your vertebra/rib drawings on your blogs so that others can post comments on them.
- sue and mike: post images of your homework, including the comments tim e-mailed to you from the class session.
- everyone: visit gallery 209 before friday, september 26. there is a show up by several students who studied and made art in germany last year. choose one piece or one series by an artist and spend 30 minutes noticing what is happening in the work. write or speak these noticings (i can show you how to audio comments if you'd like), addressing the artist.
- post this writing/audio on your blog with the corresponding images.
- e-mail this post to the artist.
16 September 2008
fig drawing

here's a great figure drawing blog with beautiful examples. you'll want to come back to this one. from the profile info: the blog's creator is chris muller, teaching on fig(ure) drawing at new york university's tisch school of the arts, in the design for theater and film department.
here's an image on the rib cage:

12 September 2008
art 4o1-oo1 and 4o1-oo2 blog groups
group one:
karen barthels (Life Drawing)
chris mattox
michael tentis
kalvin yang
group two:
megan harder (Life Drawing)
sue her (xue life drawing)
xai lao (mr. x. l.)
nick ross (wisconsin winter world)
group three:
nou chee her
andrea kappelman (sketchkapp)
nicole nelms (life drawing ii)
sai xiong
alex courier
group four:
alan briggs
time howe (drawing board)
chrissy pergande
group five:
noah berkeland (figures, forms, and life blogging)
miranda haugli (in the name of art)
kalyn meisner (figures)
ashley suddendorf (landing strip)
responding
assignment for tuesday, before class: read your group members blog posts and respond to each of the other members in your group by leaving a comment on their blogs.
here are a few ideas as you respond to your group members' blog posts:
here are a few ideas as you respond to your group members' blog posts:
- look at their work and read their writing carefully, taking time
- as you begin to respond, write what you notice about the images/text, what sticks out in your mind, what you appreciate, what you've learned
- avoid giving advice
- instead of giving advice, ask questions: what do you still wonder about after looking at their post? what would you like to know more about?
- while you are responding, think about how you would like to have your images seen and your writing read. what would you want people to ask you about? or notice about your work? what questions would you like them to ask? then use those thoughts to guide your response to others.
- as i have mentioned a few times, these blogs are yours. individually, and in small groups, and for the larger class. take ownership of this space by being an active, supportive, questioning, thoughtful responder in your small group.
11 September 2008
meditations
 A Breathing Exercise (3:11)
How simple attention to breath enhances our awareness and enjoyment of the present moment. Courtesy of Sounds True.
Calm Waters (3:22)
Using the metaphor of a mountain lake, this meditation focuses on calming turbulent feelings. Courtesy of Sounds True.
click here to listen
more about thich nhat hanh
10 September 2008
assignment
life drawing two students:
your assignment:
create a blog post in which you present yourself to me, the other life drawing students, other art majors and faculty, and even outside art & design professionals who may now or in the future see your blog. present yourself as the artist you are now, at the beginning of the fall semseter 2008.
start by introducing yourself (remembering this is a professional space). where are you from? what concentration/year are you at stout? how did you choose your concentration? where do you hope to go after stout? what does your ideal life as an artist/designer look like?
include at least three images. ideally, these images will be of your best artwork or designs you have produced as a student at stout. if you do not have access to those artworks, present the best that you have.
write at least one paragraph for each image: describe your process of creating it, what problem you were trying to solve, what course it was for, what you trying to achieve, why you think it is a successful work, etc. you do not have to follow these questions exactly. they are examples of questions to ask yourself as you write about your work.
basically, show and tell us who you are as an artist through texts and images. begin your story of this semester in life drawing.
today during class, i will assign small groups so you will each have three (+/- depending on the class numbers) students to respond to over the weekend.
if you haven't created your blog yet...
...you're falling behind!
alex courier
nicole nelms
chrissy pergande
ashley suddendorf
also, all of you please check for your blog in the lists to the side and let me know if your blog is in the wrong class section. this organizing of names and sections is hairier than i thought it would be.
p.s. is anyone's blog titled "the cage"? it is in my "blogs i'm following" list, but there are no posts on it yet and i can't figure out who it belongs to. let me know!
let me know if you need help creating your blog, sending me the url, or posting your first assignment. or if i have somehow missed what you sent me.
06 September 2008
population:485
 for a wonderful story of a small town in wisconsin (new auburn, an hour north of here).
michael perry is a writer who embodies both the guy from the small-town (supposedly "uncultured") with the meditative story-telling, acute observations, and careful language of an artist.
he writes the story from the perspective of a volunteer fire fighter--so you can imagine how he gets into the realities of life and death, even from chapter one.
as a visual artist (who grew up in small-town iowa myself and now call wisconsin home) i really appreciated perry's observations, his humor, and the way he weaves together the characters and events of his hometown to tell the story of his life, and how he found his place in a community.
this is the book we read this year at stout for into the book. the library has a web page on it, too. here
 find an excerpt here:
chapter one
an audio excerpt here:
harper collins
& perry's website:
sneezingcow.com

04 September 2008
animation podcast

here is the podcast i mentioned in class yesterday. this website/radio station from PS1 has a ton of good info.
03 September 2008
advanced life drawing (for those of you taking LD II for the 2nd [or 3rd, or 4th] time)
advanced life drawing students
your assignment:
this writing assignment will begin a half-semester project as described below (see images and link below):
learning by drawing


your assignment:
- create your blog as listed in the previous entry.
- what would you like to spend at least half (maybe the whole) semester learning about?
- what field of study does it typically reside in (psychology, biology, english, art history, etc.)?
- what interests you about it?
- how will you use/incorporate the figure to explore these questions?
- what is your planned method of investigation and research?
- where will you learn about this subject?
- what media, scale, format, etc. will you use as you create your drawings?
this writing assignment will begin a half-semester project as described below (see images and link below):
- create a body of work (due at midterm, approximately October 23) in which you are asking a question, researching a new topic, learning about something you'd like to know more about.
- rather than simply creating drawings that are expressive, creative, beautiful, etc. you need to begin with the idea of learning something.
- this something does not have to be art-related, though it can be.
- find a subject that you'd like to explore, question, learn about, become familiar with through drawing.
- research it by reading, observing, and drawing.
- refine/redefine your questions about your subject.
- create more/finished drawings by midterm.
- we will discuss this in more detail in class and have scheduled one-on-one time as well as group critiques.
learning by drawing


first things first


the first assignment for each of you is to:
- create your own blog for this course. you can do this at blogspot (where this blog is hosted) or any other blogging site.
- send a comment or link to this blog (www.lifedrawingtwo.blogspot.com) indicating your blog's title and url.
- your blog will be the place you upload images of your drawings, images of your classmates' drawings for comments, and create your own set of information relating to the course.
 your blog will serve as a type of electronic sketchbook--a public one, one that will be available to me and the other students in the course.
- it will also serve as a type of portfolio, or the beginning of a more formal e-portfolio that can build/merge into a professional tool as you move through your curriculum at stout and out into the art & design world.
- your blog will be a professional space for you to track your progress in life drawing 2, to reflect on your process and work, and to create/present your self as an artist who has particular interests (for one reason or another) in life drawing.
- your blog will offer images, links, and other information that will help other students in the course learn about you and life drawing--consider it a place to present ideas that you may not have time to in class, especially if you are the quiet type who has difficulty speaking up in class.
- your blog will be in-progress, just as a sketchbook.
- it will be graded to the extent that it lives up to the criteria i set for it, and sometimes i will give you specific assignments to due on your blog. i also expect you to work on it on your own, to have a certain number of posts that you create without my prompting.
- so... it is a professional space, an artist's space, and will have some criteria that will be graded in the end, but part of the criteria will be to be reflective in your blog, to write with language that is authentic, to be honest with yourself and your classmates. and to feel free to "express yourself" (though i hate the stereotyped meaning of that phrase, it can still mean something if you're serious about it) through your images, writing, links, and comments so that the viewer/reader of your blog can get a sense of who you are as an artist and how you are different than any other college student/emerging artist by what you choose to include in your blog.

sketchbook stack photo: http://www.fixpert.com/artwork/illustration-history/
villard sketchbook image: http://commons.wikimedia.org/wiki/Image:Villard_de_Honnecourt_-_Sketchbook_-_17.jpg
- Author: Villard de Honnecourt
- Source: Sketchbook of Villard de Honnecourt (about 1230)
- MS. 19093 French Collection, Bibliothèque Nationale, Paris (No. 1104 Library of Saint-Germain-des Prés until c.1800)
welcome

life drawing 2 students:
welcome to (one of) our new home(s). and semesters.
i am not shy about my strong dislike of D2L (or learn@stout)--mostly because it is so non-visual. how are artists supposed to learn like that? or have a desire to do so?
this blog is my answer to this. it will be the place to look for assignments, discussions, examples of artists' work, etc. plus anything else i find of interest or relevancy to what we're working on in class or just in general what may interest life drawing artists.
feel free to pass on information and links that i should add.
this blog will, of course, be a work-in-progress, as the semester (and academic year[s]) moves ahead.
so...here's our best to a new semester (fall 2008).
Subscribe to:
Posts (Atom)